Saturday, September 10, 2011

Sketch Challenge

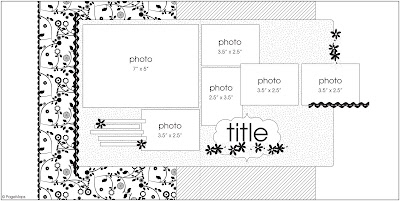
Anyone that has scrapped with me knows, I love my sketches! So when I read Lori at Apron Strings was hosting a sketch challenge, I knew it was perfect for me. Below is my take on 3 of the challenges, all using this PageMaps sketch.


Challenge #3- Use the sketch as is (I also combined 2 vertical 4x6 photos to fill the larger 5x7 spot and cropped my photos a bit larger as that worked better for the images I was using)

Challenge #4- Re-orient 2 photos (I also added a additional photo)


Challenge #6- Replace 2 smaller photos for a larger one (I misted over an alphabet mask to create the "background" paper for the right-hand side... and then couldn't bear to cover it up with the large mat so I matted all the individual photos to make them pop a bit)
Pin It

Thursday, September 1, 2011

December Daily 2010- Day 6-10


Day 6-
The left side is the back of the glitter chipboard (it’s WHITE chipboard). The right side is just another piece of thick grey cardstock. I added a mini paper clip and “Adore” ticket stub to the top and a strip of patterned paper under the photos. I love these photos. Its this kind of stuff that I really want to document… I fear our days of innocent holiday “decorations” are numbered. 


Day 7-
Another salvaged cover of a Christmas card on the left with some patterned paper and a postage stamp. There’s really no right-side base here, just our Christmas card with some canvas Technique Tuesday stickers sandwiched together and a canvas Thickers number.


Day 8-
Basic Grey patterned paper covered chipboard and a red glitter numer. That’s about it here.


Day 9-
The left is the white back-side of the chipboard and the right side is another set of page protector sleeves. I added a small kraft journaling tag to the outside of the sleeve, with the Thickers number on it. Super-simple page.


Day 10-
This page was cut from a piece of die-cut journaling paper from Jenni Bowlin. This was the paper I traced to make the covers and it set the shape for the whole album. I squared up the top and bottom lines and set the size so that you could see a border of the next page behind it. The numbers are black felt, from Ki memories. The red glitter circle I made by cutting some tacky paper into a ring and sprinkling on red glitter.


Pin It

December Daily 2010- Day 1 thru 5

Forgive the image quality here, my camera doesn’t like me anymore.


Day 1-
Just ivory cardstock with a red glitter sticker strip down the right side. A small tag tucked under the top photo explains the official start of our holiday season and the opening of our advent calendar/cabinet.


Day 2-
The left is the cover of a velvety Christmas Card I salvaged. The right side base page is black and cream cardstock and a photo/note about our bedtime conversations and how they are often geared towards Christmas wish lists in December. The “dreams” sticker is black velvet. I used a self-inking date stamp behind the number 2.


Day 3-
Just grey cardstock and some trees I cut out of die-cut paper. I added patterned paper over top one of the trees and some red jewels to many of them. The dots around the number 3 are a rub-on.


Day 4-
This was such a busy day and I had so many things to document. I used page protectors as the right-side base page to gain more photo space. This was really a 12x12 page protector that had 6 4x6 sleeves and a margin on the side for a 3-ring binder. I just cut out a section to give myself these 2 sleeves and hole-punched right through them once the photos were added. Another self-inking stamp under the number 4, adhered to the outside of the page protector. The title on the left is Cosmo Cricket rub-ons.


Day 5-
The left side was just more photos on the back-side of the page protector. I punched holes in an ad from The Nutcracker Ballet we attended, stapled our ticket stubs to it and inserted it in-between the base pages. The base page on the right is glittery red chipboard. It was hard to glue onto this so I used some Zots, but otherwise, I LOVE this chipboard! The glitter stays on and will not flake off. Plus is chipboard, so it’s nice and thick. I traced my cover onto pages like this so they are the same size/shape.
Pin It

December Daily 2010- Cover


I decided I wanted a shaped album but I couldn’t find anything in stores that was quite right… so I decided to make it. I grabbed some scrap chipboard packaging and sketched out the shape I wanted using a piece of die-cut paper (see Day 10) as a guide. I free-handed the top and bottom lines, using a ruler to keep it symmetrical. I set the size based on the fact that I wanted to use some 2-high 4x6 page protectors. So the overall size was just slightly larger than 6”wide x 8” high. I made sure that the page protectors wouldn’t stick out at the rounded corners of my shaped cover. Once I had the shape, I traced it on a 2nd piece of scrap chipboard packaging so I had a front and back cover. I then painted both sides of each with black acrylic paint. Once they were dry, I used black & ivory polka dot paper (from Paper Pizzaz) to cover the front of the cover. I punched holes in each and added oversized grommets and binder rings. I added the date with some glittery red Thickers and a sticker that reads “happy Holidays.”
Pin It

December Daily 2010- intro

So I decided sometime last October that I wanted to create my first “December Daily” album. I spent an afternoon reading DD blog posts on Ali Edward’s site and browsed all sorts of Googled images and finally decided to just jump right in. I liked the concept of a mini album that gave me a little more artistic freedom beyond my normal double-page 12x12 spreads... and the freedom to create pages without page protectors! There’s just something about the tactility of a mini album that really appeals to me. So at this point it was October and I thought, “I can do this!” and “How cool will it be to have DD albums out on the coffee table year after year… to compare our lives over the years and see how our traditions have changed and how they’ve stayed the same.” It’s fair to say I was very excited about this project. Looking back at other people’s past DDs (including Ali Edward’s) many were a collection of different shaped and sized pages. Ali’s plans for 2011 was to use a “template” so to speak. Although I liked her intended format for 2011, I decided that I wanted to try the more random approach. I still wanted my album to have a cohesive feel though, so I decided to stick to a color scheme- black, grey, ivory and glittery red. Other years I’ll try something different, but that was my plan for this album. I only spent about $20 at Michael’s for some supplies (printed acetate, thick glittery red chipboard and a few embellishments) and then I rummaged through my supplies at home and threw anything that might work in a drawer together. I spent a few days creating my cover and all my base pages (a combination of printed acetate, glittery red chipboard, extra-thick cardstock in grey or ivory, some page protectors and a few paper-covered chipboard pages) and then set it aside until December.

p.s. Of course, as I write this its early September 2011… so yeah, I took a few months off. I kept up with slapping some pages together for the first couple weeks but then as our schedules got hectic, I set it aside until recently. I did maintain taking photos every day in December, I just didn’t have time to have them printed really. But that’s the nice part about having all the base pages pre-done and all my supplies gathered in one place. Even many months later it was still super easy and fun to complete!
Pin It